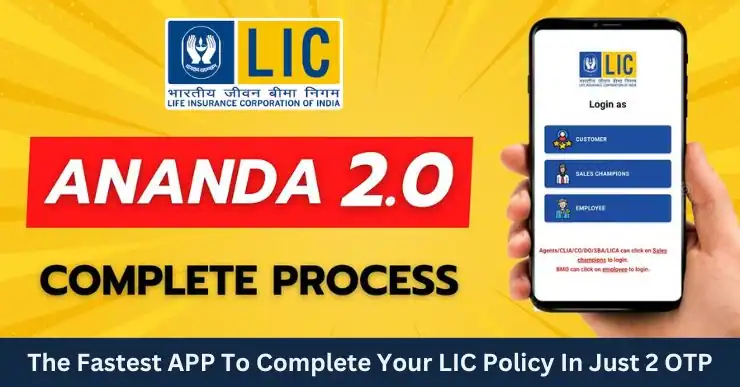
LIC has been at the forefront of the Indian insurance sector and to maintain this process, LIC keeps providing new tools and offers for its agents and customers. And recently LIC has launched another digital platform LIC Ananda 2.0. But it is still on trial, which is not available to all agents. Access to this Ananda 2.0 trial has been given to limited agents and DOs only. If you also want access to it, then you can contact your nearest branch and they will provide you access to it. Its purpose is to make the policy process simple and fast. In this article, we will learn about many things related to how to use LIC Ananda 2.0, like login process, app download, new policy booking etc.
What is LIC Ananda 2.0?
LIC Ananda 2.0 is an upgraded version of LIC Ananda 1.0 platform, designed to simplify the insurance process. “ANANDA” stands for Aatmanirbhar Agents New Business Digital Application, highlighting the platform’s focus on self-reliance and digital innovation for agents. The 2.0 version brings several improvements, making it easier for agents to serve their customers and for customers to manage their policies.
Key features of LIC Ananda 2.0
Talking about the key features of Ananda 2.0, it is much better than the previous Ananda 1.0. Its new version comes with a user-friendly interface that makes navigation easier. Ananda 2.0 facilitates faster digital policy booking. In this way your proposal is completed within just two OTPs. For this, you have to fill the necessary information to apply. This saves both time and paperwork.
In this case, you will not need to upload the offline eKYC zip file of Aadhaar. As soon as you enter the Aadhaar number or PAN number, all your details present on the government portal will be automatically fetched here. Along with this, the agents and customers who used to sign up here the last time will not need to enter the OTP number again.
This Ananda 2.0 app of LIC keeps giving real-time updates and notifications to the users about their policy status and premium dues.
The best thing about this portal is that you can also complete the policy for children in it. Suppose the children do not have Aadhaar, then whatever valid proofs of children are there, like a birth certificate, a school mark sheet, or any other proof, you have to upload them here in PDF format, and your policy gets issued on that basis.
How to Download the LIC Ananda 2.0 App
Downloading the LIC Ananda 2.0 app is simple and can be done on both Android and iOS devices. But it is still on trial, which is not available to all agents. Access to this Ananda 2.0 trial has been given to limited agents and DOs only. If you also want access to it, you can contact your nearest branch, and they will provide you access to it.
Registration and Login Process on LIC Ananda 2.0 App

The Website of Lic Ananda 2.0 looks something like this: first, you will see three options for login.
- customer,
- sales champion.
- employee
In this agent, CLIA, CO, DO, SBS, and LICA have to go to the sales champion option and do the policy as it is written below. After this, you have to click on sales champion.

So as soon as you click on Sale Champion, the next interface will look something like this, in which you will get many options to login. Now here, if you are an Agent, CLIA, or CO, then you will have to enter the agent code; if you are DO, then you will have to enter the SR number; if you are SBA, then the SBA code; and if you are LICA, then you will have to enter the LICA code.
When you login here for the first time, you can login through OTP, or if you want, you can also create a password by entering the Username ID.
Detailed Guide on Policy Booking in LIC Ananda 2.0 App

After logging in, you will see many plans for LIC in the next interface. LIC has made available about 33 plans on Ananda 2.0. You can see these plans in All Plans or Category wise, or you can also search here.
Now click on the plan you want from these. We have selected Jeevan Labh; after that, you have to click on Proceed below.

Now here in the quotation, first of all, you have to fill in the lead details, in which “Basic detail of proposer” means you have to enter the basic details of the customer that are asked here, like their name, date of birth, gender, mobile number, WhatsApp number, if different, then you have to mention it here, then you have to enter their email id here, and in the residential status, you have to select Resident Indian and click on Proceed.
After clicking on proceed, whatever details you had filled out here will start appearing here; after this, you have to go down.
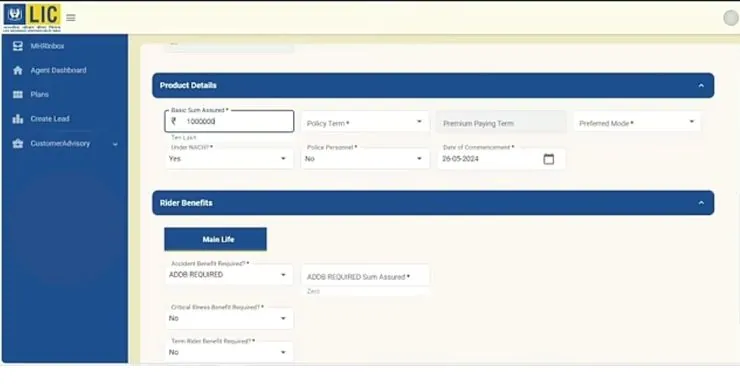
Here, you have to fill in the product details. In the product details, first of all, you have to fill in the sum assured. For example, if we want to take a sum assured of 10 lakhs, we have filled 10 lakhs. After this, you have to select the policy term. Which term do you want to take? Then which mode do you want to take? For example, monthly, quarterly, half-yearly, or yearly. Select any one of these. If it is in NACH, then you have to select yes for NACH, and in monthly mode, NACH is compulsory.
Below you get to fill in the rider benefits, in which the first accident benefit is to be given, so here you can select it, like if we have a policy of 10 lakhs, then an accident benefit of 10 lakhs is included, and if a customer does not want it, then you can select it as not required and then click on calculate premium.

As soon as you click on Calculate Premium, you will see the monthly, quarterly, half-yearly, or yearly premium here. If you want, you can download the benefit illustration by clicking on Benefit Illustration. Then here you have to click on Save Quote, and then below you have to click on Proceed.

After clicking on proceed, you will get to fill in the agency details. Now that I have logged in as DO, as soon as I enter the agency code, all the information related to me will start showing here. Similarly, if you log in as an agent, you also have to enter your agency code, and then all your details will be filled out. After this, you have to click on Update Details. After clicking on Update Details, you have to click on Proceed to Proposal.

Here you will see an access ID at the top. You have to note down this access ID somewhere so that if you get stuck anywhere, you can track it with this access ID.
After this, you have to fill in the CKYC details below. If you have the customer’s CKYC number, then fill it here. CKYC means Central KYC number, in which your Aadhaar and PAN are all linked in one place. You just have to enter that one number, and all your details come here.
If the customer does not have this number, then it does not matter; you have to click on No and get KYC fetched through Aadhaar or PAN. If you do it through Aadhaar, then you can get their details fetched by entering the last four digits of Aadhaar, or you can get their details fetched by entering the PAN number.
Now here is the First Time OTP goes to the customer. In this, we have got the details fetched; whatever is there in it will be shown here. Apart from this, a notification will also go on WhatsApp.

So now all your details are visible here. If all your details are correct, then you have to click on “yes, I want to proceed with ckyc,” and if there is something wrong with your details, then you have to click on “no, I do not want to proceed with ckyc.”

After this, you have to proceed with the offline e KYC process here, which was earlier inside Ananda. In this, the e KYC file has to be downloaded in a zip file and uploaded. If you do it this way, then it will take a lot of time. The first process is easy, and we will do it. Then click on Proceed.

After clicking on Proceed, the process of filling out your CKYC details is completed successfully. The next option is to fill in the insurable details.

The first option is personal, in which all your details will be visible. In this case, you will have to provide an alternate mobile number. Whatever your alternate mobile number is, you will have to enter it here. Next, you will have to write your marital status and your spouse’s name. Then, in the next step, you will have to write the place of birth. Next, if you are an IT assessee, then you will have to write IT assessee. And then here you will have to enter the PAN number, which is mandatory. Then, after this, you have to write your name in the PAN.
You will then be asked about your GST registration, whether you are registered under the GST Act. Select Yes if you are registered and No if you are not. You will then be asked whether your tax residence is outside India; select Yes if you are from outside India and No if you are from India.

The next option you will see is address details. Here you will see almost all the address details present in your Aadhaar. Apart from this, you can also change it here if you want.
In the address, you have to keep in mind that you should always write the name of the customer’s father in the first line of the address. This makes it easier to reach the bond customer because even if people in his area do not know him by name, most people recognise him by his father’s name.

The next option is for additional information. Here, under additional information, you have to choose the purpose of insurance. In this, you have to choose the purpose of taking insurance, risk cover, savings, or something else. Here we have chosen risk cover and savings.
In a tax bracket, you have to choose in which tax bracket they fall. After this, if you have any loans, etc. running on you, then you have to write about them here; otherwise, leave them at zero. After this, in the annual income option, you have to write your annual income. Where is it coming from—from a job, business, or many other sources? You have to write all that here.

The next option is for occupation details. First of all, you have to select the present occupation. In this, you have to select their present occupation. Then, depending on the exact nature of the duties, you have to select their duties. Then, in the source of income, select their income source. Then, in the education qualification, select their qualification.
Then fill in their length of service. Then write the names of the present employees. Then fill in their last annual income. If there is income from the last two years, then you have to mention that here as well.

The next option is Previous Policy. In this case, if the customer had taken a policy earlier, then you have to enter the details of that policy here. As soon as you enter the details of the policy, the details of the old policy start appearing in front of you. If you want to add a policy to this, then you can do that too. If there is a policy for any other insurance, then you can add that too. If the customer did not have any policies earlier, then you have to proceed by ticking both options here.

The next option is family history. Here you have to fill in the family details, like what is the age of your father; what is the age of your mother; whether they are alive or not; details about them have to be entered here; how is their health; whether it is good or not; all this has to be written in this manner.

The next option is to fill in the bank account details. Here, you have to fill in the bank details. After filling in the bank details, you have to enter the NACH details here. If you want to keep the same bank account for deducting monthly payments, then you can also provide the same bank account details in it.

The next option is to fill out the questionnaires. Here, you have to fill out the questionnaires carefully. If there are none of these in your personal history, then you have to select No.
Then, in State of Health, you have to write their exact height and weight.
Then, here in the settlement option, if they want to take the money received on death in installments, then select Yes; otherwise, leave it as No.
If there is anything about him in the previous insurance details, then select Yes or No.
Medical history, family medical history, habits, etc.—almost all the things have NO selected, so if everything is NO, then there is no need to tamper with it. If you still have to fill them out, then you can fill in all these details by talking to the customer, and then after that, you have to click on proceed.

Now you have to enter the nominee details here. Who do you want to be the nominee? For example, suppose I want to make my mother the nominee. So her details have to be filled out here. Apart from this, if you want to add more nominees, like two, three, or multiple nominees, you can set the percentage here and click on add. Then you have to click on save proposal. Then whatever application you have here will be saved.

Now here comes the option to upload the document. Here you have to upload the document for the address proof of the customer, which includes the Aadhaar card, driving license, passport, etc. You can upload the PDF of any one of these three things here.
The option to upload the address proof is coming here because we had made changes in the address line in the beginning in which we had written the father’s name first and then entered the full address, so that’s why it is asking for the proof here, so we will upload the PDF of Aadhaar here because the father’s name is also written in the PDF of Aadhaar.
So if you change the address, then only you get this option. If you do not make any further changes to the address, then there will also be no option to upload the address proof. Only the option of a self-cancel check will be shown here; that too is optional; you can do it if you want; otherwise, it is not compulsory.

After this, the next option is a premium payment. Now here, you have to choose the mode through which the customer wants to make the payment. If he wants to do it offline, then you have to get a BOC issued from their office. Then you have to adjust by entering the BOC number. It is best to choose the online mode in which the payment link will automatically go to the customer, and then he can make the payment from PhonePe, Paytm, UPI, debit card, netbanking, etc. from wherever he wants. Here we select the online option and click on proceed.

Now the last and final menu that comes is that of ACR (Agent Confidential Report), so when you fill out the Agent Confidential Report, you have to enter details about all the customers, since when do you know them, what is their income, what is their height and weight, have you taken any proof? You have to fill out all these things here, and then, after ticking the checkbox in the declaration here, an OTP will be sent to the agent’s email and mobile. You have to enter that OTP here and then click on Verify OTP, and then the agent’s own Agent Confidential Report will also be uploaded here.

After that, a verification link is sent to the customer in the mail, where he can see his premium by clicking on “Click to View Proposal,” and also whatever details you have filled out can be seen here.

After this, he can do the verification by clicking on Send OTP. So this second OTP goes to the customer. The first one goes when we do eKYC, and the second one goes when the customer himself verifies it.

Then here you can select the payment mode, through which gateway you want to make the payment. In this way, your payment gets completed here, and after some time, if the sum assured is less here, then your automatic policy gets generated, and if the case is a little bigger, then it gets completed in your branch, as normally it gets completed in Ananda 1.0, and similarly, it gets completed here in 2.0.
Managing MHR in LIC Ananda 2.0

So this was our process for LIC Ananda 2.0. I hope you understood the whole process well. After doing all this, you can see here that under MHR, if you are a DO, then if there is any pending MHR, you can fill that MHR.

Inside the Agent Dashboard, whatever lead quotation proposals you have seen, all of them will be shown here. All the plans that are available in it will be shown here. If you want to create a new lead, then you have to go to New Lead Creation and do it.

If you have to do any calculations in Customer Advisory, then you can do all that here.
Benefits of Using LIC Ananda 2.0
Here we have explained the benefits of using LIC Ananda 2.0 for both agents and customers.
For Agents
- Time Efficiency: Streamlines policy booking and management processes, saving time.
- Increased Productivity: Automates routine tasks, allowing agents to focus on client interactions.
- Real-time Data Access: Provides up-to-date information, enhancing decision-making.
For Customers
- Convenience: Manage policies from anywhere, anytime.
- Transparency: Access detailed policy information and updates in real-time.
- Enhanced Experience: Simplifies policy management and communication with agents.
Conclusion
LIC Ananda 2.0 is a game-changer in the insurance industry, offering a comprehensive digital platform for policy management. Whether you are an agent or a customer, understanding and utilizing this platform can significantly enhance your experience. From easy policy booking to efficient management of medical records, LIC Ananda 2.0 has it all. By following this detailed guide, you can navigate the platform effortlessly and make the most of its features.
FAQs about LIC Ananda 2.0
What is LIC Ananda 2.0?
LIC Ananda 2.0 is a digital platform developed by Life Insurance Corporation of India to streamline policy booking, management, and other insurance-related services for agents and customers.
Can we do NRI policy in Ananda 2.0?
No NRI cases have been filed but option is available for NRIs in 2.0
How to get a receipt
Customer will get a receipt on mail or you can contact the branch to create offline FPR for Ananda cases
Read More: